I'm so excited to share my Pinterest Thursday: I Tried It! Project with you all today.
In preparation for my upcoming craft shows, I've given a lot of thought to how I can display my jewelry at my booth. Since I'm sort of just testing the waters here, I don't want to spend too much money on jewelry display items and pieces. So, I've been trying to figure out inexpensive ways to set up my booth and show off my inventory while still having a cute, unique, attention-grapping display. I've been gathering ideas at my
Craft Show Display Ideas board on Pinterest.
I've thought of all sorts of frames and boards and foamy things to hang my necklaces and earrings from, but rings are a different story. Bring in this wonderful little pin I found:
|
| Ring display pin, click through to get to tutorial |
The pin is for a tutorial on how to make your very own ring display box/tray/thing from a cutlery tray. Now rewinding, when we first moved into our house, I bought a new cutlery tray for the kitchen, only to find it was slightly too big to fit in our drawer. I threw it in the back of my car to eventually return to Bed, Bath, and Beyond, but let's face it, that place can sometimes seem like the 6th circle of hell, and I don't like going in unless I have $250 lying around that I want to throw away.
Thus, much to the annoyance of my husband, I never made it around to returning the cutlery tray. Fastfowarding, when I saw this tutorial, I was like, AHA! Finally something I can do with that tray! Now I can make a super cheap ring display box AND avoid ever stepping into Bed, Bath, and Beyond.
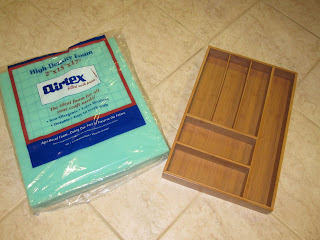
The main two items you need are any sort of cutlery tray type thing and some upholstery foam, which I found at Joann.
Some scissors and a box cutter or a knife are also helpful, along with some relatively thick fabric. If your fabric is too thin, you'll be able to see the green foam through it.
Use your scissors or a knife to cut out foam pieces to fit in the cutlery tray divisions. In the pinned tutorial, she uses just one big tray, so it's a lot easier. Sadly I was working with a tray with lots of divisions, so I had a lot of cutting to do. I was sort of worried my final result might look odd with all the divisions, but I think it turned out just fine (you'll see soon).
Here's my box with the foam pieces fitted in. I then took my knife and started slitting lines through the foam where I wanted to be able to sit the rings. I sliced the lines about half-way into the depth of the foam, and I tried to keep my lines straight (but didn't really succeed) and evenly spaced.
After I was done cutting lines, I took my fabric and cut it into pieces, and basically stuffed in into the sliced lines, folded it under the pieces of foam, and stuffed it all into the box. I used the point of my scissors to really stuff the fabric in there and make it as taut as I could get it. I chose a basic neutral colored muslin fabric. I planned to paint my tray a bright green and I really wanted my rings to be able to pop against a non-distracting background.
After spraypainting the tray green (and thus restuffing all the foam pieces), this was my final result:
Yeah, some of my lines aren't straight, and my fabric is a little wrinkly in places, but once this baby is full of rings I think it's going to look great! I also love the green color. I can't wait to see it on my craft show table full of shiny things! The only bad thing is that when I made it, I realized how many rings I need to make to fill it up! I put EVERY ring I currently have for sale on it in this picture, and you can see it's like....1/5th full! I have a LOT of work to do!
I think this is a great project even for non-craft show vendors. You could make one of whatever size you want for your own personal ring collection and show it off on your dresser or vanity. It'd also make a cute handmade gift for a friend! I'd also like to think you can't really notice that it started out as a cutlery tray...


