My blog has moved!
You should be automatically redirected in 5 seconds. If not, visit redirectLink" href='http://lazyowlboutique.com/'> http://lazyowlboutique.com and update your bookmarks.

 
about shop links contact home
Showing posts with label DIY. Show all posts

Wednesday, May 9, 2012

Spring Craft Show Display

As I mentioned (not sure if I did actually, let's pretend), I did a craft show last month in Katy, Texas.  Setup was all day the Friday before the show started.  My craft show adventure weekend started out pretty stressful.  It was a really busy week at my day job, and my husband ended up having to work late on Friday (and all day Saturday) so I was flying solo nearly all weekend.  I left work as quickly as I could to go home to grab my tables and inventory and head out on the 45 minute drive out to Katy, during rush hour AND during a terrible thunderstorm.  Of course when I finally got home, my puppy had peed all over her crate.

By the time I made it out to Katy, I had about an hour to set up as much of my booth as I could all by my lonesome.  After check-in I found out my booth was not actually IN the main arena, but in a hallway...directly outside the MEN'S restroom!  The show director promised me this would be a preemo (primo? premo? is it even a word?) spot, so I decided to put a smile on my face and make the best of it.

Anyway, it wasn't a super wonderful show, but it was my best yet (out of 3, still a craft show newbie here), and a great experience.  I met some other wonderful vendors, made some good sales, and handed out almost all my business cards.

Plus, I got to debut my new and improved show display!  I graduated from 2 to 3 tables, with the addition of my vintage china plate tiered displays (that's a mouthful!), and all my new titanium post earrings.  I also made a handful of colorful yarn wreaths to sell.  AND I got to try out my new VistaPrint banner!

One side of my display

Oh hello, men's restroom!

Antique shutters, antique plates, yarn wreaths...

Handmade earring card display for my plated stud collection

Birdhouse display and antique printer's tray display
Check out my tutorial for how to make my DIY ring box display here, and also an explanation for how I built my DIY earring card display here.

I'll be setting up my display again May 19 at the Friendswood Fine Arts Institute's Art in the Park!

Thursday, February 23, 2012

Pinterest: I Tried It! Antique Rake Jewelry Holder

This pin has been on my "Organization Inspiration" pinboard for quite some time now:

Rake Jewelry Holder on Pinterest

I get dressed and accessorized in my bathroom.  The problem is, all my jewelry holders and boxes are on the dresser in my bedroom...not exactly a long walk away, but my favorite pieces of jewelry tend to wind up on my bathroom counter, so while getting ready I usually just pick up whatever is around in the bathroom.  Thus, I frequently neglect all the fun jewelry that's sitting in the jewelry holders in the bedroom nearby.

I liked the idea of this antique rake jewelry holder because I can utilize the limited wallspace in my bathroom to hang some more jewelry in there, and then I'll be more likely to wear more of what I own, since it'll be right there in my face!

I didn't have any cool antique rake heads lying around, so I decided to buy myself some since I liked this idea so much.  I found not one, but two awesome rake heads for sale on Etsy at thejunkman.

After bothering my handy husband to attach them to the wall, I went to town hanging all my necklaces.  Here's the final result (I apologize for the awful shadows):


The silver single pearl, antique gold knot, and fabric rosette necklaces are all from Etsy.

The two long strands of pearls, large teal crystal,bird's nest, and purple gem necklaces are all from Etsy.  The aqua necklace is similar to one I have for sale in my shop.

I think now I might add a length of twine or ribbon across the top of the rakes so I can hang even more dangling earrings in here.  Exciting!


Monday, January 30, 2012

Ikea Hack: Built-in Bookshelves Tutorial

So I guess my blog has not been very heavy on the tutorials, but I do have one DIY project I did (with the help of my husband) that I'd really like to share!  So here goes my attempt at writing a DIY tutorial.

When my husband and I first moved into our new house last year, we were excited by all the space we were going to have.  Going from a 1300 square foot apartment to a 2500 square feet home meant lots and lots more space to enjoy!

However, one thing that sort of confused me was the fact that we were going to have two "living" rooms.  Living room, den, family room, whatever you want to call them, our new house had two.  The back of the house has an open kitchen, a breakfast nook, and a large space for an open living room.  This is sort of the heart of our home, and we chose this living room to be the place where we set up our nice, big comfy u-shaped couches and our entertainment center with the television.

That left us with the question...what do we do with this huge front living room?  When you enter the front door of our house, you are greeted with a large open dining room and living room (a column separates the two areas), along with the stairwell going up to the second floor.  Since we already had our couches and media in the back living room, we weren't sure what to do with the front one.

There were lots of possibilities, but I eventually decided that I'd like to make it a library of sorts.  The wall of just the living room section was about 15 feet long.  I envisioned a posh space with a couple of fun couches, floor lamps, a cozy rug, and a long row of lovely custom built-in shelves filled with books and other special mementos.

Back to reality, we just dropped our savings on a house.  Not really any spare pocket change for fifteen feet of nice custom built-in wall to wall bookshelves.

Enter our Ikea hack.  We are definitely not the first homeowners to have used Ikea bookshelves to create built-in looking bookshelves, but I like to think we put our own special touch on the project.

Here's how we did it:

1. First, we bought lots and lots of Billy bookshelves.  I spent a while on the Ikea website looking at the different variations and measurements of the Billys that are offered.  Billys are pretty much the most basic shelving system Ikea offers, you could go with some of the other choices if you preferred, but we wanted something simple that we could add on to however we wanted.

The Billy system comes with lots of options.  You can have skinny Billys, wide Billys, Billys with glass doors or wood doors.  Billys in all shapes, sizes, and colors!

Your basic Billy bookshelf
Skinny Billy on a diet


We lucked out because for our space, a combo of four wide Billys and three skinny Billys fit almost perfectly. If you want to try this project, make sure you measure your space first.  Ikea even offers a build your own option on their website, so you can see what combo of shelving units will work in your space and what it will look like.

We also bought the height extension shelving pieces for each unit.  This was basically just something that added an extra shelf to the top of each Billy, making our wall-to-wall bookshelf a little taller.

How exciting, a Billy shelf extension unit

Most importantly, do NOT forget to include the baseboard molding in your calculations. Your wall-to-wall length may be 15 feet, but you need to subtract a couple inches to account for your molding, unless you plan on removing it to slide your bookshelves in.  I'll tell you how we dealt with our molding soon.

Altogether, the purchase of the shelves cost us just under $500.  Not cheap, but when you consider you're getting fifteen feet of bookshelf, not too bad either (especially when you think about how much custom work would've cost).

2.  My next step was to assemble all the bookshelves.  This was not fun.  Mostly because there were 7 of them and it was pretty overwhelming.

I really wanted to add something special to these shelves. The back of a Billy bookshelf is basically a long sheet of particle board, aka, cardboard.  It doesn't look nice.  White painted creased cardboard doesn't fly with custom built-in bookshelves.

I knew I wanted to decorate the backs of the shelves, but did I want to paint it? Wallpaper? Fabric?  My first instinct was to wallpaper them, but I had a hard time finding some economical wallpaper.  Plus, I've never worked with wallpaper before in my life...so I went with fabric.  I figured I could staple or glue fabric to the back of each board and give my shelves some extra pizzazz.

My next challenge was figuring out where in town I could by fifteen square feet of the same fabric.  Not sure why I didn't just buy online, but I ended up roaming through JoAnn's one day.  I couldn't find several bundles of the same fabric, but I did find multiple bundles of the same pattern in two different colors.  I bought everything they had and hoped it'd be enough.  Obviously I'm really good at well-thought out projects, right?

I set to work on covering the particle backboard of each Billy with fabric.  I placed the fabric pattern-faced down on the floor, put the particle board on top of it, and cut the fabric so it had about two inches of excess on all sides.  I then hot glued these edges on the back of the particle board, being careful to evenly stretch the fabric as I glued.

Two things here, first, I don't know if I'd recommend using hot glue as I did...How long will hot glue hold fabric to cardboard?  These book shelves are here to stay, so hopefully my fabric will stay in place...forever.  I would maybe add some staples or something to make this more permanent.  Second, be careful what sort of fabric you choose.  My fabric was heavily patterned, and any extra stretch in one area was really obvious in my final product, making the pattern not line up all the way across my shelves sometimes (but nothing too bad, no worries).

Once I got my backing all situated, we could finish completing the assembly of each unit.  You sort of slide the cardboard backing in notches on the back of the unit, so that will also help hold my fabric in more permanently.


Here's my husband nailing the back board to the shelving unit.  You  can see my fabric edges peeking around.
3.  Next it was time to set up all the units on the wall.  Nervous!  Will they fit?  This can be slightly stressful because, let's face it, you're working with Ikea products here.  Plus you put them together.  Things can be a little crooked, a little uneven, etc.  Luckily, we didn't seem to have any major problems...

My husband used L-brackets to attach the top of each unit to the wall, just to up the safety factor.  Especially needed in houses with small kiddies or rambunctious doggies.

Work in progress


Ta Da!  Do you spot my serious mistake?
Here is our new wall-to-wall bookshelf.  It took me a while to figure out the best color pattern, but I think it worked out well.

At this point, I realized I had put one of the pieces on backwards (see top right corner skinny shelf), but as everything was all nailed together and what not, I could not fix it.  No biggie since we planned to cover the shelves with trim and molding.


Bonsai doggie Leo is a shelf accessory

4.  Once our unit was up, we measured the gaps on the ends between the shelves and the wall (caused mainly by our molding on the baseboards), measured the distances between shelves, and measured the distance from the floor to the top of the bottom shelf.  This way we knew how big/small the trim we bought needed to be.  We spent a long time at Home Depot mulling over what sort of molding and trim we wanted.  We went with a really basic trim for all the edges except the bottom, which was more substantial.

One weekend when I was miserably working at the office, my loving husband spent an afternoon painting all the trim white and nailing them to the shelves.  Basically the edges of each bookshelf got trim, so there was "double trim" between shelves, does that make sense?  You could also buy thicker trim that covered the edges of two bookshelves totally.  We didn't put trim on the edges of the shelf ledges themselves, since most of them are movable and we might want to adjust them someday.

Here's the unit once we added molding and trim:

Leo admiring our handy work (no he just loves those peacock feathers for some reason).
Please ignore the paint splotches on the left, we were still figuring our what color we wanted!
You can see we still have a slight gap between the wall and the unit.  It sort of ruins the custom built-in facade, but the logistics of getting it perfectly flush with the wall were too difficult and we think it looks just fine :)

5.  To complete the look, my husband wired in some overhead lighting.  Before installing the last shelf, he dropped a plugged-in extension cord behind the shelves so we could have some lighting.

oooooooh!

6.  Decorate, decorate, decorate!  I spent a long time playing around with the adjustable shelves.  I didn't want the unit as a whole to look too symmetrical.  I made sure to put my heaviest books and display items along the bottom or middle shelves, the ones that weren't adjustable, since they are probably the strongest.  I had a lot of fun just going to Hobby Lobby and buying cute items for display - vases, frames, bird cages, candles, bookends...My favorite item is the turquoise vase with the peacock feathers, right in the middle of the unit.  You may also notice that many of my display items are things I've bought from Etsy!

Once I put all my books on the shelf, I was amazed at how it suddenly looked like I owned no books, just because the shelf was so huge.  I look forward to having tons of space for our library collection to grow.


Other than painting, this was the first major project we undertook for our new house.  It was a lot of work, but definitely worth it.  I love the extra pop that the fabric backing adds to the shelves.  When we have guests over, the wall-to-wall library is usually one of the first things they notice.  We finally got couches (like, 11 months later!) for the room, so hopefully we will be getting more use out of our library soon.

I hope you enjoyed this tutorial!  Please let me know if you have any questions.


Monday, November 7, 2011

First craft fair experience

Sorry it has taken me so long to update about my first craft fair experience.  Last week (on Halloween), we picked up a stray dog.  We could not keep him since we already have 2, one being a newly rescued puppy, so I spent the week desperately trying to find an adoption/foster program that would take him in.  EVERY no-kill rescue program in the city of Houston was at max capacity.  Just when I thought we were going to have to send him to animal control (and basically sign his death warrant, as he was a big black pit mix), I found a friend in Baton Rouge who would give him a loving home.  AMEN!

Moving on to a totally unrelated note, here are pics and a review of my booth from my first craft show on October 29. 


I had paid for an outside booth, and luckily the weather was nice, although a bit chilly.  It was the first weekend of colder temps in Houston this fall.  As you can see, thanks to the suggestions from yall, I did cave in and make a small sign.  Obviously it's nothing special, just paint on a piece of blue poster board, but I figured this sign was better than no sign.  I've already devised a better banner for my next show, so have no fear.

I made a few last minute changes to my set up, and put my printer's tray of crystal earrings on the taller table rather than the small card table as planned.  The sun was shining into one corner of my area, and I wanted to try to put the crystal earrings in the sun where they could really sparkle!


Necklaces and stud earrings were displayed on my card table...That's a mannequin from Pottery Barn, a Goodwill frame with hooks and fabric, and another Goodwill frame with twine strung across the back and mini clothes pins to hold up my earring cards.


Here's my booth as a whole.  As far as my experience went, my day was SLOW.  I was really excited to be there and excited about my booth display, since I worked so hard on it...but I quickly realized that this show did NOT have the right audience for me.  It was the 40th year of this show at an established Episcopal church in a suburb of Houston.  The crowd was about 80% 60+ ladies.  Nothing against the older crowd, they just weren't into my stuff.  The tupperware ladies were the booth next to me and they were selling like hotcakes (however I did overhear their total revenue at the end of the show, and they didn't make much more than me, mostly because everything they sold was from their $1-$3 bins). 

It was at least a learning experience.  I made back about three times the booth fee, but that still wasn't much.  Most everyone that bought something from me was one of the few young moms there, buying something for themselves or for their daughters.  My rosette stud earrings were popular for the daughters and I sold mostly those.  Much to my surprise, people were most interested in the rosette studs and my button rings.  People just loved buttons.  Unfortunately I didn't make many of my button wire rings large enough to fit the fingers of the older ladies (I generally make them sizes 5-7 to aim for the more youthful Etsy crowd who for some reason seem to have smaller fingers haha).  I didn't even list any of the stud earrings in my Etsy shop until after the show, so I was surprised at that.  I had assumed that my old hollywood crystal jeweled earrings would be the biggest crowd pleaser, particularly in my white printer's tray display, but not very many people looked at them.  I am thinking it's a little early to build a hypothesis though based on this one show.

I also got some experience using Square, which went very smoothly.  About half my transactions were via credit card, and Square deposited the money in my account within a couple days.  No problems there!

Finally, I got an opportunity to just step out of my shell for a day, which I'm sure I really needed.


Stud display above. Pictured below are my old hollywood style earrings displayed on an antique printer's tray, a shutter from re-Habitat, and a wire file folder holder from Hobby Lobby.

I'm really looking forward to my next show.  Since I created SO much inventory for this past one, I won't have to bust my butt over the next few weeks making things.  This one will be December 3 & 4, two whole days, and I'm thinking the demographic will be more my speed, at least I'm hoping!

Please let me know what you think of my booth display and if you have any suggestions for me!

Thursday, October 27, 2011

Preparing for my very first craft show

Ahhhhhhhhhh.  Saturday I'm vending in my very first craft show/fair/festival/whatevs.  I'm pretty scared.  I'm a pretty socially awkward/shy person, so I'm also pretty anxious about just putting myself out there and interacting with *strangers*! Haha.

As you may know, I'm an avid researcher and reader for any topic I'm unfamiliar with.  Thus, I've been scouring the blogosphere and Etsy forums and reading all about how to prepare for a craft show.  Other than just general nerves, I feel like I'm as prepared as I can be.  I've had the tables set up in my living room for about 2 weeks now.  I've set up my Square account and practiced swiping credit cards.  I've got $100 in cash change.  I've got receipt books, an inventory spreadsheet and a clip board, handheld mirrors, a vending apron, table risers....

The past month I've taken my inventory from about 45 items to 240 items (wowzers!).  I've also been diligently working on creating displays and a table setup as cheaply as possible.

Here's my practice setup thus far (I haven't ironed the table cloth yet so please ignore the wrinkles!)


Here's a summary: I've got a 4 foot table on the left with a printer's tray that my helpful husband spray painted white and screwed in tons of little half inch brass hooks.  I hung crystal earrings of various sizes on the hooks.  On that table, I also have a cheap wrought iron file folder holder and an old little shutter as earrings displays.

The table cloths are just cheap full size bed sheets I found in a neutral tone.  I bought a little cheap lace tablecloth to spice up the crystal earrings table.


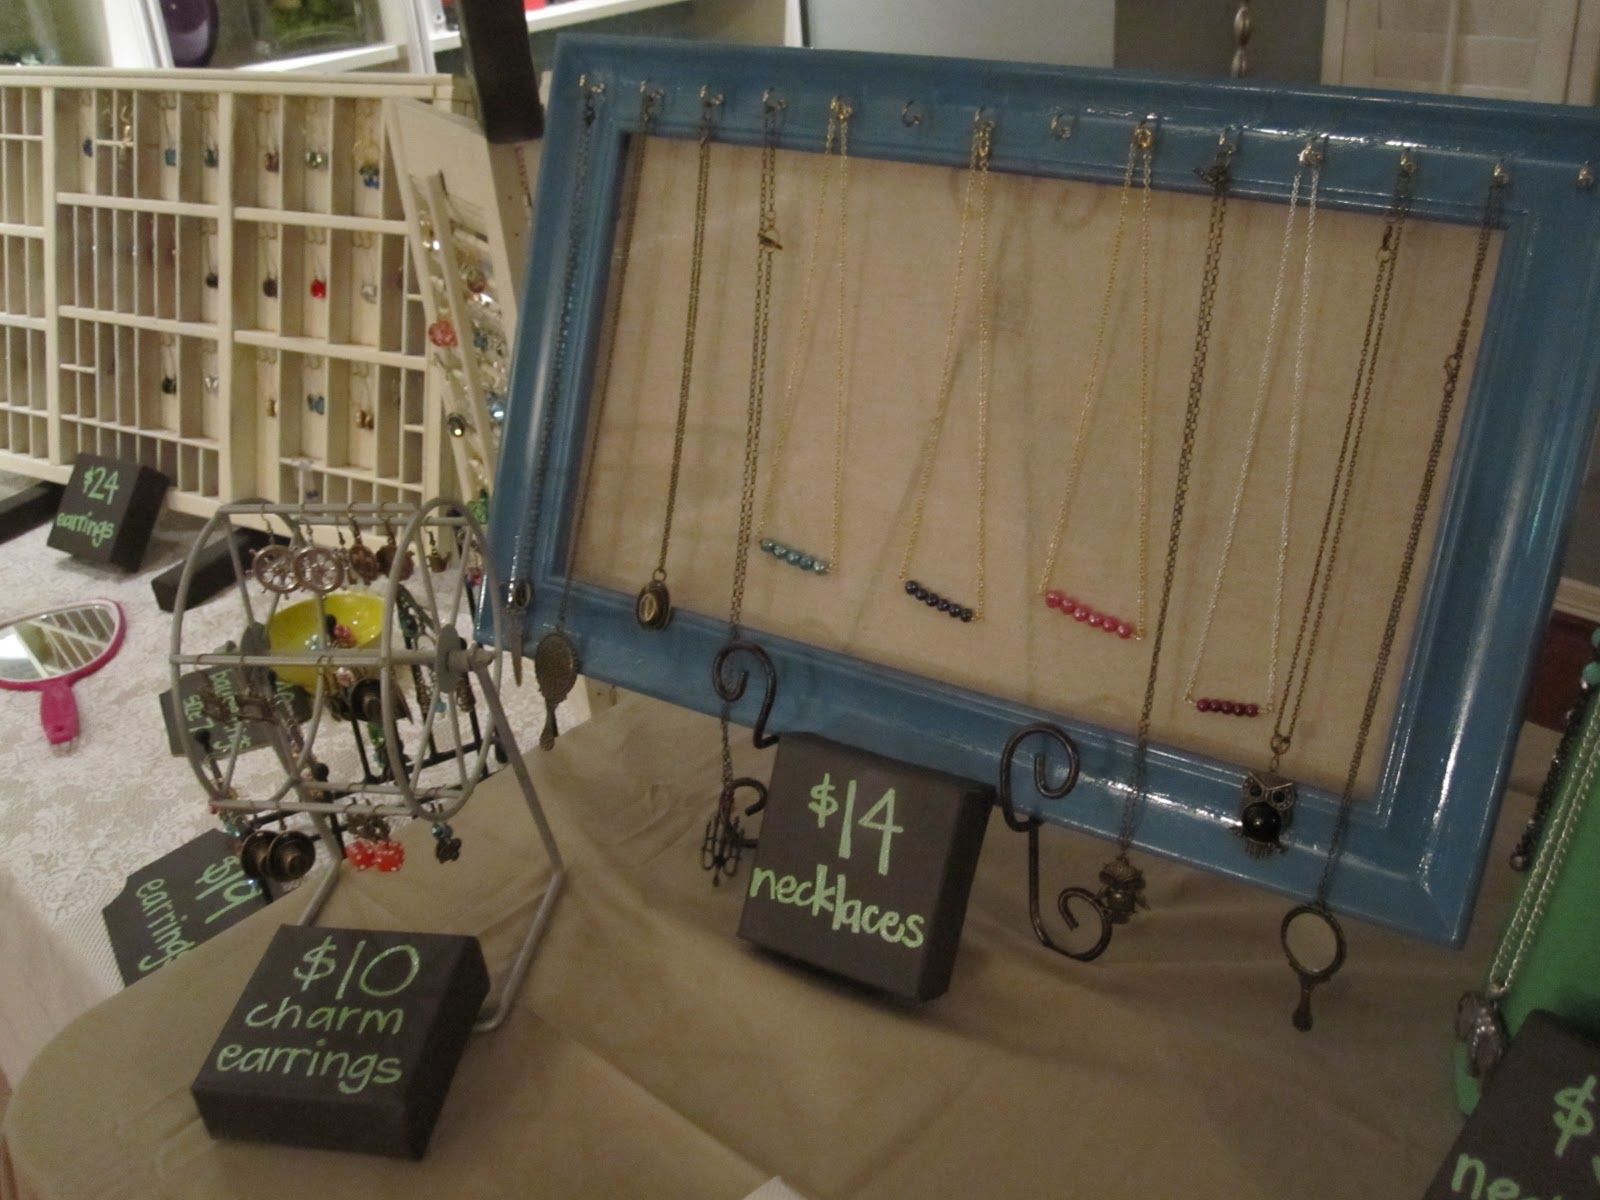
My main 6 foot table has all my stud earrings on the right (hopefully I'll be listing some of these in my Etsy shop soon).  I bought the main three frames on this table from Goodwill for cheap and spraypainted them.  The one in the center is actually a memo board I covered with new beige fabric.

You can see the ring box I discussed making in this post in the center of my table.

The memo board dispays all my bunting necklaces, and the blue frame on the left has hooks on the top to hold my other necklaces.

I hope the printer's tray will grab some peoples' attention...


Bunting necklaces!

For the stud earring display, I strung twine along the back of the open frame and used tiny sized clothing pins to hang up my earrings cards.


I found the little wire ferris wheel at Goodwill and used it to hang my charm earrings.  I also got little tiny canvases, spray painted them brown, and used them as my pricing signs.  It was quite difficult grouping over 200 items into just a few price ranges, but I really did not want to price each item individually as I thought it'd just be too time consuming.

What do you think?  Give me your feedback!  My biggest worry is that I do not have a SHOP NAME anywhere on my table! I mean, I have my business cards out, and I had bought a large canvas to paint Lazy Owl Boutique on, but there's just no room to put it out on the table so I gave up....hopefully it's not too big of a deal.  I'm thinking if this whole craft fair venture is successful, I'll order some sort of professional banner with my name and logo and everything.

Wish me luck yall!


Thursday, September 29, 2011

Pinterest Thursday: Ring Display Box

I'm so excited to share my Pinterest Thursday: I Tried It! Project with you all today.

In preparation for my upcoming craft shows, I've given a lot of thought to how I can display my jewelry at my booth.  Since I'm sort of just testing the waters here, I don't want to spend too much money on jewelry display items and pieces.  So, I've been trying to figure out inexpensive ways to set up my booth and show off my inventory while still having a cute, unique, attention-grapping display.  I've been gathering ideas at my Craft Show Display Ideas board on Pinterest.

I've thought of all sorts of frames and boards and foamy things to hang my necklaces and earrings from, but rings are a different story.  Bring in this wonderful little pin I found:


Ring display pin, click through to get to tutorial

The pin is for a tutorial on how to make your very own ring display box/tray/thing from a cutlery tray.  Now rewinding, when we first moved into our house, I bought a new cutlery tray for the kitchen, only to find it was slightly too big to fit in our drawer.  I threw it in the back of my car to eventually return to Bed, Bath, and Beyond, but let's face it, that place can sometimes seem like the 6th circle of hell, and I don't like going in unless I have $250 lying around that I want to throw away.

Thus, much to the annoyance of my husband, I never made it around to returning the cutlery tray.  Fastfowarding, when I saw this tutorial, I was like, AHA!  Finally something I can do with that tray!  Now I can make a super cheap ring display box AND avoid ever stepping into Bed, Bath, and Beyond.

The main two items you need are any sort of cutlery tray type thing and some upholstery foam, which I found at Joann.


Some scissors and a box cutter or a knife are also helpful, along with some relatively thick fabric.  If your fabric is too thin, you'll be able to see the green foam through it.

Use your scissors or a knife to cut out foam pieces to fit in the cutlery tray divisions.  In the pinned tutorial, she uses just one big tray, so it's a lot easier.  Sadly I was working with a tray with lots of divisions, so I had a lot of cutting to do.  I was sort of worried my final result might look odd with all the divisions, but I think it turned out just fine (you'll see soon).


Here's my box with the foam pieces fitted in.  I then took my knife and started slitting lines through the foam where I wanted to be able to sit the rings.  I sliced the lines about half-way into the depth of the foam, and I tried to keep my lines straight (but didn't really succeed) and evenly spaced.

After I was done cutting lines, I took my fabric and cut it into pieces, and basically stuffed in into the sliced lines, folded it under the pieces of foam, and stuffed it all into the box.  I used the point of my scissors to really stuff the fabric in there and make it as taut as I could get it.  I chose a basic neutral colored muslin fabric.  I planned to paint my tray a bright green and I really wanted my rings to be able to pop against a non-distracting background.

After spraypainting the tray green (and thus restuffing all the foam pieces), this was my final result:


Yeah, some of my lines aren't straight, and my fabric is a little wrinkly in places, but once this baby is full of rings I think it's going to look great!  I also love the green color.  I can't wait to see it on my craft show table full of shiny things!  The only bad thing is that when I made it, I realized how many rings I need to make to fill it up!  I put EVERY ring I currently have for sale on it in this picture, and you can see it's like....1/5th full!  I have a LOT of work to do!

I think this is a great project even for non-craft show vendors.  You could make one of whatever size you want for your own personal ring collection and show it off on your dresser or vanity.  It'd also make a cute handmade gift for a friend!  I'd also like to think you can't really notice that it started out as a cutlery tray...


life by the book


Thursday, September 8, 2011

Pinterest Thursday: I Tried It!

This week I wanted to try a cute pin I found a while ago:


We travel a lot (or so I thought, until I made this haha), so I thought it would be really cute.  We also just moved into our house in December, so we still have a lot of empty wall space to decorate.  I thought this cute little handmade map would be unique and a great way to personalize a room.

You can check out the original tutorial to get step-by-step instructions.  I followed them with just a few changes.  I bought a 16x20 canvas for cheap at Hobby Lobby, a bunch of cute scrapbook paper, some miscellaneous cute small buttons, some paint for the canvas, and a pack of wooden letters.  I also already had some Modge Podge at home.

 Oooh a bunch of scrapbook paper...

I knew it would take me a good while to cut out all these states (curse you, New England).  One weekend when the husband was out of town, I had yet another TV marathon (I think this time it was Fringe) cutting out all the states.


I printed to poster so the states would be big enough to fit on my rather large canvas.

Then, I cut out each state (that took forever).  I rotated through all my scrapbook papers and traced each state on them.  Since I didn't have as many papers as I did states, I just made sure to keep all the patterns spread out (does that make sense?). 

I painted my canvas blue.  You can see in the original tutorial she uses a more neutral beigey color, but I love bright blue and I thought it'd look ocean-y.  After it dried, I glued on my states as precisely as I could.  I then modge podged over the entire map to give it a nice glossy look and hold down any curling ends of the paper.

I debated adding any words or a title to my map.  I didn't really want "Oh the places you'll go", which is a Dr. Suess quote the original tutorial uses.  We don't have any kids yet so I just wasn't feeling the Seuss.  I decided on "Wanderlust".  I painted the letters a bright green and glued them on my canvas.

The finishing touch was gluing my little buttons on the map for the places we'd visited.  My husband and I agreed on some ground rules.  I could only "button" places we had both visited together, and we had to have stayed overnight there (not just driven through). Only one button per state, even if we've been to multiple cities, and I put a heart button for the two cities we've lived in -- Baton Rouge and Houston.

Ta da! Sorry for the crapola picture.  Really bad lighting.


Turns out the only states we've visited are all the southeastern ones....plus Massachusetts (where the button is practically bigger than the state).


I sort of start rushing when I get tired of working on a really tedious project, so I wish I had taken more time with the letters at the top.  I painted and glued them on before they were totally dry and got some green smudges on my canvas...but oh well :)

I'm really glad I made this, and I can't wait to be able to add more buttons to it!  Hopefully someday oneday it will be full!

And that conclues this week's Pinterest Thursday!

Do you want to participate in Pinterest Thursday?  Feel free to join me and link up at bythebookpaper!

life by the book


Related Posts Plugin for WordPress, Blogger...